Posts Tagged ‘flixel’
-
Flash Game Dev Tip #4 – Bullet Manager Part 2
5th Mar 201111
Tip #4 – Flixel – Bullet Manager Part 2
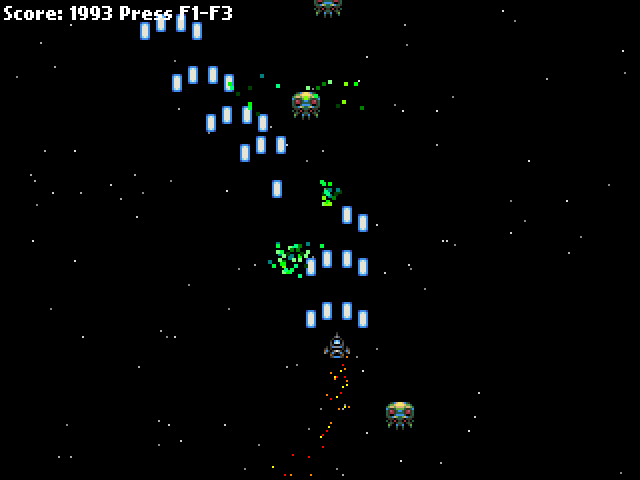
This tip follows-on from Tip #3, where we got a player controlled space-ship up, and had it fire all kinds of bullet death. In this tip we’re going to add something to use those bullets on – an Enemy manager, and a particle effect for when they are shot. By the end it’ll look like this:
Enemy Manager
As with the bullets in the previous tip we are going to create an Enemy Manager. This class will be responsible for creating a pool of enemies, launching them and recycling them when killed.
package
{
	import org.flixel.*;
	import flash.utils.getTimer;

	public class EnemyManager extends FlxGroup
	{
		private var lastReleased:int;
		private var releaseRate:int = 500;

		public function EnemyManager()
		{
			super();

			for (var i:int = 0; i < 100; i++)
			{
				add(new Enemy);
			}
		}

		public function release():void
		{
			var enemy:Enemy = Enemy(getFirstAvail());

			if (enemy)
			{
				enemy.launch();
			}
		}

		override public function update():void
		{
			super.update();

			if (getTimer() > lastReleased + releaseRate)
			{
				lastReleased = getTimer();

				release();
			}
		}

		public function bulletHitEnemy(bullet:FlxObject, enemy:FlxObject):void
		{
			bullet.kill();

			enemy.hurt(1);

			Registry.fx.explodeBlock(enemy.x, enemy.y);

			FlxG.score += 1;
		}

	}

}
Our Enemy Manager works identically to the Bullet Manager from before. It starts by creating a pool of 100 enemies, which I admit is probably 90 more than we actually need at this stage of the game! Enemies are just extensions of an FlxSprite, and by default they have their exists value set to false, so they are free for allocation by the manager.
The manager overrides the flixel update function. All we do in there is check the value of the timer. getTimer() is a Flash utility class that gives you the number of milliseconds since the SWF started playing. It’s a really good way of timing things without having to use Timer Events, as it’s just integer based, fast and pretty accurate.
Our releaseRate is set to 500. That’s in milliseconds, so 500 would be every half a second (1000 ms per second). If enough time has elapsed we release a new enemy. This simply pull the next available enemy from the pool and call its launch function.
The enemy class looks like this:
package
{
	import org.flixel.*;

	public class Enemy extends FlxSprite
	{
		[Embed(source = '../assets/space-baddie.png')] private var enemyPNG:Class;

		public function Enemy()
		{
			super(0, 0, enemyPNG);

			exists = false;
		}

		public function launch():void
		{
			x = 64 + int(Math.random() * (FlxG.width - 128));
			y = -16;
			velocity.x = -50 + int(Math.random() * 100);
			velocity.y = 100;

			health = 4;
			exists = true;
		}

		override public function kill():void
		{
			super.kill();

			FlxG.score += 20;
		}

		override public function update():void
		{
			super.update();

			if (y > FlxG.height)
			{
				exists = false;
			}
		}

	}

}
We extend an FlxSprite but make two significant changes.
3, 2, 1, Launch!
The code in the Enemy launch function does two things. 1) It places the enemy at a random x coordinate, and just off the top of the screen, with a random x velocity. And 2) it resets its health to 4 and tells flixel it now exists.
By giving it 4 health it means it’ll take 4 shots to kill the alien.
We also override the kill function to give the player + 20 points to their score once the alien is dead.
The final small change is in the update function. If the alien flies off the bottom of the screen, we set its exists to false. If we didn’t do this it’d just carry on flying down into game space, where the player will never see it, and eventually our pool would run out of aliens to launch.
Collision
Our PlayState.as class has been expanded ever so slightly from last time. It now includes the enemies on the flixel display list, and the fx class which we’ll cover in a moment.
Crucially in the update function we run a collision check:
FlxU.overlap(Registry.bullets, Registry.enemies, Registry.enemies.bulletHitEnemy);FlxU is the flixel general utilities class. And one of those utilities is called “overlap” which will tell us if any two objects are overlapping. The parameters you pass are the two objects to test and a function to call if the overlap is true.
You can pass in whole groups of objects, which is what we do in this case. We’re asking flixel to check all bullets in the bullets group, against all enemies in the enemies group. And if it finds an overlap from two “alive” (existing) objects it will call the bulletHitEnemy function inside the Enemy Manager class.
The code for this function can be seen above, but it works by taking the 2 objects as parameters (in the order in which you define them in the overlap call, so in our case bullet first and enemy second.
In this game bullets can only hit once. So we call
bullet.kill();which will remove the bullet from the screen, and free it up ready for use again by the bullet manager.
The alien however is a little more robust. Remember we set it to have a health of 4? So when it gets shot we’ll “hurt” it by 1. Flixel objects have a hurt() method, which when called will reduce the objects health variable by the amount given:
enemy.hurt(1);In this instance we’ll “hurt” it by 1. Perhaps if the player was using super-bullets we could hurt it by 4, which would kill it instantly. Flixel will minus this amount from the health of the alien, and if its equal to zero it then calls kill on the object. As we over-rode the kill() method in Enemy.as we know the result of this is that the player gets 20 points added to their score.
After the bullet has been removed, and the alien hurt, we unleash a particle effect and increase the players score by 1. So for every bullet that hits an alien their score increases by 1, and a small particle shower happens.
The particle effect is controlled by the Fx class. When the alien is hit we call:
Registry.fx.explodeBlock(enemy.x, enemy.y);Our explodeBlock function takes 2 parameters, and x and a y value which it uses to control where to start the explosion effect.
Boom, shake the room
The Fx class is responsible for controlling our FlxEmitters. In the world of flixel these are objects capable of emitting a series of FlxSprites with pre-defined velocity, rotation and gravity. Basically, you can make pretty particle effects using them.
Our Fx class creates a pool of 40 FlxEmitters and puts them into an FlxGroup. Every emitter is the same.
It also creates one more emitter called jets. This is used to create the jets trail that comes from the back of the players space ship.
In the Fx class we over-ride the update function and use it to position the jets at the x/y coordinates of the player:
jet.x = Registry.player.x + 4;
jet.y = Registry.player.y + 12;
The +4 and +12 values are just to position the emitter into the correct place, so it looks like it is coming from the back of the ship rather than the top left (the default x/y origin).
As you can see, having access to the player via the Registry is extremely handy here (see Tip #1 if you don’t know what the Registry is)
The explodeBlock function is the one that launches the particle shower when an alien is shot. It’s extremely simple:
public function explodeBlock(ax:int, ay:int):void
{
	var pixel:FlxEmitter = FlxEmitter(pixels.getFirstAvail());

	if (pixel)
	{
		pixel.x = ax;
		pixel.y = ay;
		pixel.start(true);
	}
}
It just gets a new emitter from the pool (if there is one available), places it into the correct x/y location for where the bullet hit the alien, and starts it running. The true parameter tells the emitter this is an explosion, so all of the particles will be fired out at once rather than bursting continuously.
Download
With just a few extra classes our game has now come on quite a way. We’ve got aliens that fly down at you, bullets that can blow them to shreds, a nice particle trail following the ship and a pretty explosion for when things go boom. All in very few lines of hopefully easy to follow code.
In the next tip I’ll make the enemies fire back at you, give you a health bar and a number of lives. We’ll then add a scrolling tilemap background to really elevate things.
Download the source code and SWF from the Flash Game Dev Tips Google Code Project page.
-
Flash Game Dev Tip #3 – Bullet Manager Part 1
25th Feb 2011
Tip #3 – Flixel – Bullet Manager Part 1
If you are coding a shoot-em-up, or even a platformer with guns, then you’ll have a need for the player to be able to fire bullets. Or the enemies to fire at you. This tip is about creating a Bullet Manager class. The class is responsible for the launch, update, pooling and re-use of bullets.
Object Pool
Creating new objects in Flash is expensive. By “new objects” I mean code such as:
var bullet:Bullet = new Bullet();
… which creates a brand new object an assigns it to bullet.
And by “expensive” I mean it takes time for Flash to process the request for the new object, assign memory to it and create it. If you are firing off tens of bullets every few seconds this can take its toll. And if you don’t actively clean-up the objects created you can quickly run out of resources.
To mitigate this problem we create a “pool”. This is a pool of resources (in our case bullets) that the Bullet Manager can dip in to. It will look for a free bullet, and recycle it for use in the game. When the bullet has finished doing what bullets do best, it will free itself up for use again. By using a pool you avoid creating new objects on the fly, and help keep memory in check.
Meet FlxGroup
Thankfully flixel has a class you can use to make this process simple. It’s called FlxGroup. You can add objects to a group, there are plenty of functions for getting the next available resource, and you can even perform group to group collision. Objects in a group are all rendered on the same layer, so are easy to position within your game. The first task is to create a pool of bullets to draw from.
In this example we’ve got a class called Bullet.as. Bullet extends FlxSprite with a few extra values such as damage and bullet type.
package
{
	import org.flixel.FlxSprite;

	public class Bullet extends FlxSprite
	{
		[Embed(source = '../assets/bullet.png')] private var bulletPNG:Class;

		public var damage:int = 1;
		public var speed:int = 300;

		public function Bullet()
		{
			super(0, 0, bulletPNG);

			//	We do this so it's ready for pool allocation straight away
			exists = false;
		}

		public function fire(bx:int, by:int):void
		{
			x = bx;
			y = by;
			velocity.y = -speed;
			exists = true;
		}

		override public function update():void
		{
			super.update();

			//	Bullet off the top of the screen?
			if (exists && y < -height)
			{
				exists = false;
			}
		}

	}

}
The important part is that the bullet sets exists to false when created to make it immediately available for use. When fired the bullet will travel up the screen. The check in the update method simply sets the bullet to not exist once it has passed y 0 (the top of our screen).
So far, so simple. Next up is the BulletManager.as class. This extends FlxGroup. It begins by creating a pool of 40 bullet objects and adding them to the group ready for use. As all of them have exists equal to false none will render yet.
package
{
	import org.flixel.*;

	public class BulletManager extends FlxGroup
	{

		public function BulletManager()
		{
			super();

			//	There are 40 bullets in our pool
			for (var i:int = 0; i < 40; i++)
			{
				add(new Bullet);
			}
		}

		public function fire(bx:int, by:int):void
		{
			if (getFirstAvail())
			{
				Bullet(getFirstAvail()).fire(bx, by);
			}

		}

	}

}
It has one extra method called fire. This gets the first available bullet from the pool using getFirstAvail (the first bullet with exists equal to false) and then launches it from the given x/y coordinates by calling the bullets fire function.
Are you feeling lucky?
I insert the Bullet Manager into the games Registry (see Tip #1 if you don’t know what the Registry is) so my Player class has easy access to it. My Player class is a simple sprite with keyboard controls to move it around. When you press CTRL it will fire a bullet:
Registry.bullets.fire(x + 5, y);The Bullet Manager handles the request and launches a bullet up the screen. The +5 after the x value is just to visually align the bullet with the middle of the space ship, otherwise it’d appear off to the left.
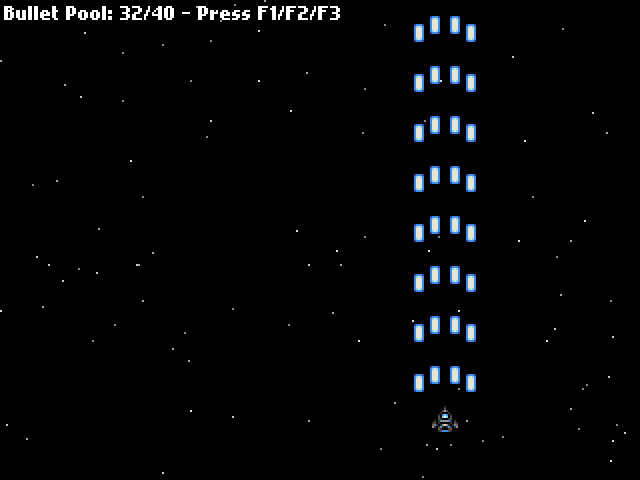
At the beginning of the Bullet Manager class I hard-coded in a limit of 40 bullets. That is enough for my game. As you can see in the screen shot above I’m only using 32 bullets out of a pool size of 40.
This value may not be suitable for your game. I don’t know what value you need, only you do. Perhaps you are coding the next Ikaruga, in which case you probably need 40 bullets per pixel 🙂 The thing is, you can tweak this as needed. And you can tweak it in-game too. It’s not a value that should change dynamically, but it could easily change from level to level as the game progresses.
Download
This example is about as simple as I could make it, but hopefully you can see the benefits already. In the next tip I’ll add group collision detection and something for you to shoot at.
Download the source code and SWF from the new Google Code Project page.
-
Flash Game Dev Tip #2 – Flixel and TweenMax pausing together
19th Feb 2011
Tip #2 – Flixel – Flixel and TweenMax pausing together
This is a super-simple tip, but I see it overlooked all the time. TweenMax is an extremely popular tweening engine for Flash. And rightly so. It’s fast, comprehensive, well documented and has loads of cool plugins. Ok so the object syntax is a little magical, but on the whole there are many good reasons to use it.
However one thing I see quite often is that when flixel games are paused, the tweens carry on playing. In a best case scenario it just causes visuals to glitch a little, in a worst case the game could crash.
The fix is amazingly easy, but it does require you to tamper with the core of flixel. For some reason there seems to be a serious allergy when it comes to devs wanting to do this, as if the framework itself is sacracant, never to be touched by mortal hands.
Utter bollocks.
Get in there and get dirty! It’s the only way to learn how it works. It’s a framework, not a bible. I’m quite sure when Adam created it he had no such illusion that it could do everything, and when it can’t, you bend it to do so.
So how do you get your tweens to pause in unison with your game? Easy, open up FlxGame.as and at the top import TweenMax, just like you would when using it in any other class. Then search for these two functions pauseGame() and unpauseGame()
For pauseGame change it to become:
/**
 * Internal function to help with basic pause game functionality.
 */
internal function pauseGame():void
{
	if((x != 0) || (y != 0))
	{
		x = 0;
		y = 0;
	}
	flash.ui.Mouse.show();
	_paused = true;
	stage.frameRate = _frameratePaused;
	TweenMax.pauseAll();
}
As you can see we’ve added the final line which tells TweenMax to pause everything. That’s tweens and delayed calls. This is an extremely useful feature of TweenMax, and well worth using instead of TweenLite (which doesn’t support this).
You can guess what we’re going to do with unpauseGame I’m sure:
/**
 * Internal function to help with basic pause game functionality.
 */
internal function unpauseGame():void
{
	if(!FlxG.panel.visible) flash.ui.Mouse.hide();
	FlxG.resetInput();
	_paused = false;
	stage.frameRate = _framerate;
	TweenMax.resumeAll();
}
While we are poking around here you’ll also notice that flixel changes the stage frame rate when it’s paused. If you don’t want it to you could always comment that line out. Equally you’ll see the Mouse pointer is shown and hidden from here too. If you’re not using a custom cursor, or want your mouse pointer visible all the time (like I do) then comment out both those lines as well.In short – play and experiment! Flixel is not a religion, it’s a framework. You build on-top of frameworks, and you tweak them until they fit.
-
Flash Game Dev Tip #1 – Creating a cross-game communications structure
12th Feb 2011
Tip #1 – Flixel – Creating a cross-game communications structure
As moderator of the flixel forums there is one question I see time and time again. It starts something like this: “how can I make X talk to Y, especially when the State changes?”. The problem is a classic OOP one, and thankfully there is a classic OOP approach to solving it. Have a look at the following diagram:
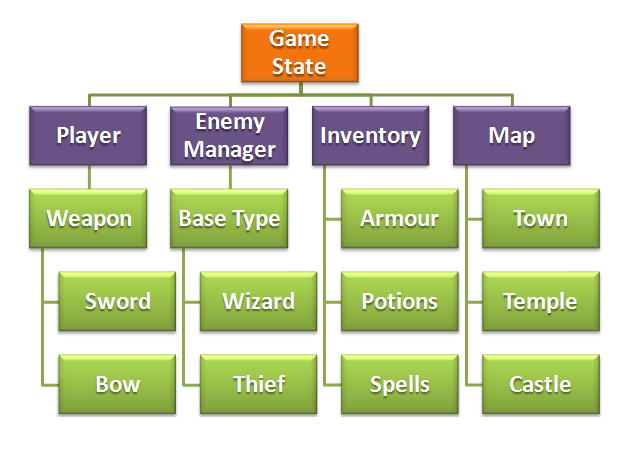
Here we have part of a mock-up Game State structure for an RPG game. As part of the state you can see the Player, an Enemy Manager, an Inventory (which both Player and Enemy can share) and a Map consisting of several important locations.
Of course this is just a rough-example, so don’t get bogged down in the semantics or structure of it. Instead think about how inter-dependant all of these objects are on each other.
- For example perhaps the Temple won’t allow the Player to enter if he is carrying a weapon.
- What if when fighting the Thief you win, but he steals a Potion from your Inventory before running away.
- Perhaps the enemy wouldn’t even attack you if he realised what Sword you were carrying?
- A Wizard casts a fireball at you. How much of the damage does your Armour repel?
In all but the most simple of games it’s vital that your game objects can communicate with each other. And communicate effectively.
When you create your Game State you could first make the Player object, and then pass a reference of that into say the Enemy Manager, so the baddies it creates can check out your vital stats prior to attack. But passing references around like this gets messy, and it’s all too easy to leave “open ends” that don’t get cleared up as needed. In a worse-case scenario they could leak memory and crash Flash Player. And in a “best case” they just confuse you during development.
One Ring to Rule Them All
My suggestion is to use a Registry. A Registry is “A well-known object that other objects can use to find common objects and services.” (Martin Fowler, P of EAA) – sounds ideal, right?
They are extremely easy to create too. In your Project create a file called Registry.as – Here is an example file based on the structure above:
package
{
        import flash.display.Stage;
        import org.flixel.*;

        public class Registry
        {
                public static var stage:Stage;

                public static var player:Player;
                public static var enemies:EnemyManager;
                public static var inventory:Inventory;
                public static var map:Map;
                public static var weapons:Weapons;
                public static var potions:Potions;
                public static var spells:Spells;

                public static var previousLevel:int;
                public static var enemiesKilledThisLevel:int;
                public static var enemiesKilledThisGame:int;
                public static var arrowsFiredThisGame:int;

                public function Registry()
                {
                }

        }
}
It consists of a bunch of static variables that map to the main objects required in our game. Not everything has to go in here, just the objects that you need to either retain their content when you change state, or objects that you know you’ll need to reference from elsewhere in your code, no matter how deep you get.
You can also see a few stats (previousLevel, etc) that are just holding details about the number of baddies killed in the whole time they played the game. Perhaps they can be used for achievements.
So how do you use them?
Quite simply by referencing them in your code. For example say we’ve got a Soldier. Our class file Soldier.as contains all the functions he can perform. One of them is attack, but before he attacks he checks out the player to see how much health he has. We do this via the Registry:
if (Registry.player.health < 50)
{
    attack();
}
So our wimpy Soldier will only attack if he thinks he has a chance of defeating you! "health" is just an integer in our Player.as file that holds the current health of the player. You use the Registry as a conduit between the objects in your game. It's a means for any object to gain access to another object or service, regardless of its depth in your structure. Once you start planning and thinking in this way, designing your game starts to become a lot easier. Your game objects can "share" knowledge of the game without the need for passing references or instances. Another example. Here we have a CharacterDialogue class. It's responsible for the speech and interactions between characters in the game. It too has access to the Registry, which means you can do things like:
if (Registry.map.castle.getNumberOfSoldiers() >= 20 && Registry.player.potions.hasStealth == false)
{
    speech = "The castle is heavily guarded. A stealth potion should help";
}
On a more “arcade” level enemies can use the Registry to get player x/y coordinates, or to find out if he’s colliding with something. I often have a class called SpecialFX in my games, which is referenced in my Registry as fx. The class contains various particle effects such as “spurting blood” and “sparks”. This means that when an enemy dies, in their kill() function I can call:
Registry.fx.bloodSpurt(this.x, this.y);
As long as the “bloodSpurt” function is public then a shower of blood will erupt forth, based on the x/y location of the enemy that just died.
I prefer this approach to the opposite. Which would be that the enemy creates a “blood spurt” particle when it dies and is responsible for displaying and running that. I just find the above neater. It ensures that the classes deal with their specific tasks and don’t “cross breed”.
Populating your Registry
If you use the example Registry above then it’s just full of empty (null) objects. You need to instantiate each object before it can be used.
When you do this is up to what fits best for your game, and it will vary from game to game. But there are two common methods:
1) When the game first starts (after the pre-loader has completed)
2) Every time your main Game State beginsIf you do not need to maintain objects once your game has ended (i.e. the player has died and was sent back to the main menu) then you can populate your objects right as the first thing you do when your GameState starts:
public function GameState()
{
        super();

        Registry.gui = new GUI;
        Registry.player = new Player;
        Registry.map = new Map(level1);
        Registry.inventory = new Inventory;

        add(map);
        add(player);
        add(gui);
}
Here is the constructor of my GameState.as file. We create the objects and then add them onto the display list.
If you don’t want to “over-write” the player like this (perhaps it has stats you wish to retain no matter how many times the game is re-started) then you’d need to move the object creation elsewhere in your game. Perhaps as part of your FlxGame class. Here’s an example:
package
{
        import org.flixel.*;

        public class GameEngine extends FlxGame
        {

                public function GameEngine()
                {
                        Registry.player = new Player;
                        Registry.reachedLevel = 0;

                        super(640, 480, MainMenuState, 1);
                }
        }
}
It’s up to you where you do this, just don’t forget to do it!
House-Keeping
If you have objects in your Registry that you don’t need to keep should the game end, then you can create an erase function inside your Registry. All it needs to do is set the objects to null:
public static function erase():void
{
        player = null;
        hud = null;
        debris = null;
        weapons = null;
        map = null;
        aliens = null;
        pickups = null;
        sentryguns = null;
        storyblocks = null;
        lazers = null;
        hacking = null;
        boss = null;
        bossfire = null;
        enemyfire = null;
        terminals = null;
}
And then just call Registry.erase() when your game ends, before it changes to your menu state.
This will ensure you keep memory down. As flixel doesn’t let you create any custom events, then you shouldn’t have anything left lingering by using this method.
Final check-list
1) Registry.as should be at the top level of your Project
2) All vars declared within it should be public static if you want to access them outside of the Registry class itself
3) Access it from anywhere by calling Registry.object – Do not create an instance of it.
4) If you use FlashDevelop then you will get full auto-complete of anything you put into the Registry!
5) You can put Flixel base types in there too: spaceShip:FlxSprite is perfectly valid.
6) If needs be you can also put common functions in there. But try to avoid this practise, there are better ways.Further Reading
You can read about the Registry pattern in the book Patterns of Enterprise Application Architecture by Martin Fowler.
You could extend the Registry to be a singleton, so that only one instance of it may ever exist (and further attempts to create them would error). There are pro’s and con’s for doing this. Personally I don’t need to as I never instantiate my Registry anyway, but I can see the merits of adding that “safety net” check in.
-
Cat Astro Phi is finished and up for bidding on FGL
5th Nov 2010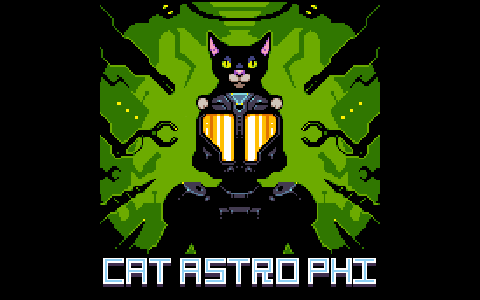
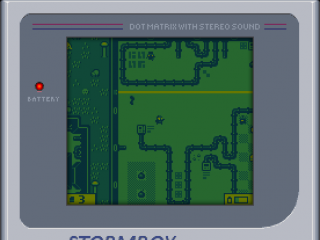
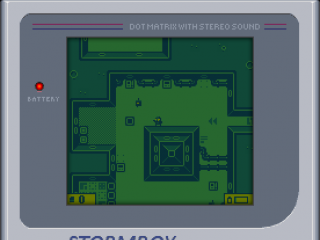
Cat Astro Phi is a game Ilija and I have been working on, and tinkering with, for the past month or so. I always wanted to make a Gameboy Classic game, back in the day, but was too young and never got the chance. This changed when in August my main desktop PC died. While I waited 6 weeks for a replacement all I had access to was a very basic laptop. No Flash IDE, no Photoshop, no SoundBooth. Just really basic software and not much grunt power. So I thought it’d be fun to try and create a game, in the style of a Gameboy Classic, as all I had access to were super-limited apps anyway. So I restricted myself to those limitations – a resolution of 160 x 144, only 4 colours on-screen, 3 channel chip music, 8×8 tile sprites (or similar). It was a fun experience 🙂
Well one thing lead to another, and here we are two months later and Cat Astro Phi is done! Ilija has worked his usual pixel magic on the graphics and music, and together we’ve built a 3-level action adventure game. The blurb goes something like this …
“An unfortunate accident leaves your pet cat stranded. Explore and battle your way through three hostile alien planets. Each with their own puzzles, traps and inhabitants to encounter.
Created in the style of Gameboy Classic games, Cat Astro Phi features stunning pixel artwork and authentic sounds through-out. Three planets, with interactive story sequences between them, leads the player on a journey – as they explore the levels, interact with the environment, solve puzzles, hack lazer walls, explode bombs, avoid sentry guns and blow stuff up! All while searching for their missing pet cat. “
The game is in active bidding here on FlashGameLicense. If you’re a sponsor / portal then join in 🙂 Fellow FGL devs can also play the game there.
The rest of you will have to wait until it’s released into the wild I’m afraid. At which point I’ll do a proper dev write-up. Until then I’ll leave you with a couple of screen shots (click for full size).
Am glad to finally have this done 🙂 It’s been too long since we released anything (6 months), but brand new babies will do that to your productivity!
Hire Us
All about Photon Storm and our
HTML5 game development services
Recent Posts
OurGames
Filter our Content
- ActionScript3
- Art
- Cool Links
- Demoscene
- Flash Game Dev Tips
- Game Development
- Gaming
- Geek Shopping
- HTML5
- In the Media
- Phaser
- Phaser 3
- Projects
Brain Food

