Latest Posts
-
Flash Game Dev Tip #4 – Bullet Manager Part 2
5th Mar 2011
Tip #4 – Flixel – Bullet Manager Part 2
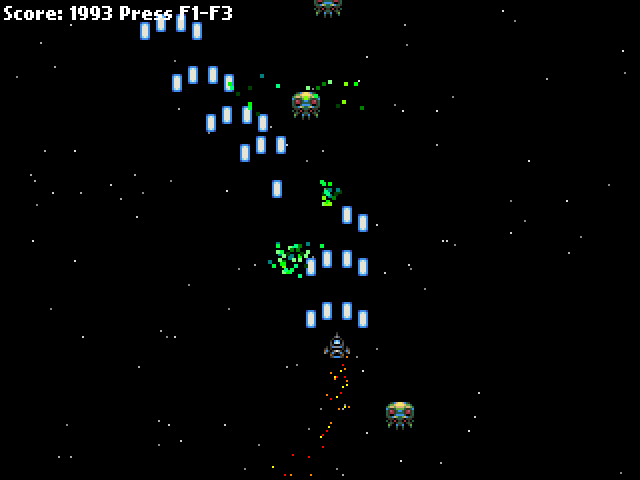
This tip follows-on from Tip #3, where we got a player controlled space-ship up, and had it fire all kinds of bullet death. In this tip we’re going to add something to use those bullets on – an Enemy manager, and a particle effect for when they are shot. By the end it’ll look like this:
Enemy Manager
As with the bullets in the previous tip we are going to create an Enemy Manager. This class will be responsible for creating a pool of enemies, launching them and recycling them when killed.
package
{
	import org.flixel.*;
	import flash.utils.getTimer;

	public class EnemyManager extends FlxGroup
	{
		private var lastReleased:int;
		private var releaseRate:int = 500;

		public function EnemyManager()
		{
			super();

			for (var i:int = 0; i < 100; i++)
			{
				add(new Enemy);
			}
		}

		public function release():void
		{
			var enemy:Enemy = Enemy(getFirstAvail());

			if (enemy)
			{
				enemy.launch();
			}
		}

		override public function update():void
		{
			super.update();

			if (getTimer() > lastReleased + releaseRate)
			{
				lastReleased = getTimer();

				release();
			}
		}

		public function bulletHitEnemy(bullet:FlxObject, enemy:FlxObject):void
		{
			bullet.kill();

			enemy.hurt(1);

			Registry.fx.explodeBlock(enemy.x, enemy.y);

			FlxG.score += 1;
		}

	}

}
Our Enemy Manager works identically to the Bullet Manager from before. It starts by creating a pool of 100 enemies, which I admit is probably 90 more than we actually need at this stage of the game! Enemies are just extensions of an FlxSprite, and by default they have their exists value set to false, so they are free for allocation by the manager.
The manager overrides the flixel update function. All we do in there is check the value of the timer. getTimer() is a Flash utility class that gives you the number of milliseconds since the SWF started playing. It’s a really good way of timing things without having to use Timer Events, as it’s just integer based, fast and pretty accurate.
Our releaseRate is set to 500. That’s in milliseconds, so 500 would be every half a second (1000 ms per second). If enough time has elapsed we release a new enemy. This simply pull the next available enemy from the pool and call its launch function.
The enemy class looks like this:
package
{
	import org.flixel.*;

	public class Enemy extends FlxSprite
	{
		[Embed(source = '../assets/space-baddie.png')] private var enemyPNG:Class;

		public function Enemy()
		{
			super(0, 0, enemyPNG);

			exists = false;
		}

		public function launch():void
		{
			x = 64 + int(Math.random() * (FlxG.width - 128));
			y = -16;
			velocity.x = -50 + int(Math.random() * 100);
			velocity.y = 100;

			health = 4;
			exists = true;
		}

		override public function kill():void
		{
			super.kill();

			FlxG.score += 20;
		}

		override public function update():void
		{
			super.update();

			if (y > FlxG.height)
			{
				exists = false;
			}
		}

	}

}
We extend an FlxSprite but make two significant changes.
3, 2, 1, Launch!
The code in the Enemy launch function does two things. 1) It places the enemy at a random x coordinate, and just off the top of the screen, with a random x velocity. And 2) it resets its health to 4 and tells flixel it now exists.
By giving it 4 health it means it’ll take 4 shots to kill the alien.
We also override the kill function to give the player + 20 points to their score once the alien is dead.
The final small change is in the update function. If the alien flies off the bottom of the screen, we set its exists to false. If we didn’t do this it’d just carry on flying down into game space, where the player will never see it, and eventually our pool would run out of aliens to launch.
Collision
Our PlayState.as class has been expanded ever so slightly from last time. It now includes the enemies on the flixel display list, and the fx class which we’ll cover in a moment.
Crucially in the update function we run a collision check:
FlxU.overlap(Registry.bullets, Registry.enemies, Registry.enemies.bulletHitEnemy);FlxU is the flixel general utilities class. And one of those utilities is called “overlap” which will tell us if any two objects are overlapping. The parameters you pass are the two objects to test and a function to call if the overlap is true.
You can pass in whole groups of objects, which is what we do in this case. We’re asking flixel to check all bullets in the bullets group, against all enemies in the enemies group. And if it finds an overlap from two “alive” (existing) objects it will call the bulletHitEnemy function inside the Enemy Manager class.
The code for this function can be seen above, but it works by taking the 2 objects as parameters (in the order in which you define them in the overlap call, so in our case bullet first and enemy second.
In this game bullets can only hit once. So we call
bullet.kill();which will remove the bullet from the screen, and free it up ready for use again by the bullet manager.
The alien however is a little more robust. Remember we set it to have a health of 4? So when it gets shot we’ll “hurt” it by 1. Flixel objects have a hurt() method, which when called will reduce the objects health variable by the amount given:
enemy.hurt(1);In this instance we’ll “hurt” it by 1. Perhaps if the player was using super-bullets we could hurt it by 4, which would kill it instantly. Flixel will minus this amount from the health of the alien, and if its equal to zero it then calls kill on the object. As we over-rode the kill() method in Enemy.as we know the result of this is that the player gets 20 points added to their score.
After the bullet has been removed, and the alien hurt, we unleash a particle effect and increase the players score by 1. So for every bullet that hits an alien their score increases by 1, and a small particle shower happens.
The particle effect is controlled by the Fx class. When the alien is hit we call:
Registry.fx.explodeBlock(enemy.x, enemy.y);Our explodeBlock function takes 2 parameters, and x and a y value which it uses to control where to start the explosion effect.
Boom, shake the room
The Fx class is responsible for controlling our FlxEmitters. In the world of flixel these are objects capable of emitting a series of FlxSprites with pre-defined velocity, rotation and gravity. Basically, you can make pretty particle effects using them.
Our Fx class creates a pool of 40 FlxEmitters and puts them into an FlxGroup. Every emitter is the same.
It also creates one more emitter called jets. This is used to create the jets trail that comes from the back of the players space ship.
In the Fx class we over-ride the update function and use it to position the jets at the x/y coordinates of the player:
jet.x = Registry.player.x + 4;
jet.y = Registry.player.y + 12;
The +4 and +12 values are just to position the emitter into the correct place, so it looks like it is coming from the back of the ship rather than the top left (the default x/y origin).
As you can see, having access to the player via the Registry is extremely handy here (see Tip #1 if you don’t know what the Registry is)
The explodeBlock function is the one that launches the particle shower when an alien is shot. It’s extremely simple:
public function explodeBlock(ax:int, ay:int):void
{
	var pixel:FlxEmitter = FlxEmitter(pixels.getFirstAvail());

	if (pixel)
	{
		pixel.x = ax;
		pixel.y = ay;
		pixel.start(true);
	}
}
It just gets a new emitter from the pool (if there is one available), places it into the correct x/y location for where the bullet hit the alien, and starts it running. The true parameter tells the emitter this is an explosion, so all of the particles will be fired out at once rather than bursting continuously.
Download
With just a few extra classes our game has now come on quite a way. We’ve got aliens that fly down at you, bullets that can blow them to shreds, a nice particle trail following the ship and a pretty explosion for when things go boom. All in very few lines of hopefully easy to follow code.
In the next tip I’ll make the enemies fire back at you, give you a health bar and a number of lives. We’ll then add a scrolling tilemap background to really elevate things.
Download the source code and SWF from the Flash Game Dev Tips Google Code Project page.
-
Flash Player 11 / Molehill Monster Link Round-up
27th Feb 2011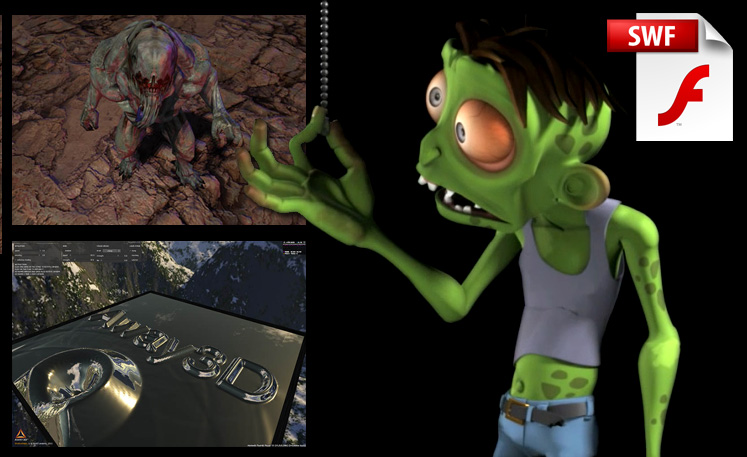
As you can imagine I follow a lot of Flash developers on twitter. When Adobe unleashed the Flash 3D / Molehill release tonight (at the Flash Gaming Summit) it pretty much went into meltdown. Developers thick and fast started releasing demos, blog posts, APIs and videos. Here I’m trying to present a small summary of where to get started if you want to build some GPU accelerated Flash 3D games, or just check the tech out 🙂
Flash Player 11 Incubator Download
http://labs.adobe.com/technologies/flashplatformruntimes/incubator/
You need this before you can do anything 🙂Flash Player Incubator at Adobe
http://labs.adobe.com/wiki/index.php/Flash_Player_Incubator
If you want to develop with it then also grab the documentation, Flex Hero release and the new playerglobal.swc files from here.Simple 2D Molehill Example
http://lab.polygonal.de/2011/02/27/simple-2d-molehill-example/
Michael Baczynski runs the polygonal blog, and has published a short article on getting simple 2D working with FlashDevelop and Molehill.Away3D 4 (“Broomstick release”)
http://www.away3d.com/
Away3D has long been the leader in 3D APIs for Flash, and an alpha release of version 4.0 was just launched. This includes all of the juicy new Molehill enhancements they’ve been working on for the past few months. There are a bunch of lovely looking demos on the site too, including:Shallow Water
Object Loader Test (lovely textured mapped face)
Environment Map Test (shiny reflective head!)
MD5 Test (walk a beautifully animated monster around a landscape).. and of course all the downloads you need to get started coding with Away3D 4.
JiglibFlash 3D Physics Engine
http://www.jiglibflash.com/blog/
Jiglib has provided physics support in most of the popular Flash 3D engines for a while, and they’ve just released a brand new build (with lots of lovely demos) that all support Away3D 4 and Molehill. Some of the demos are stunning!Unity “publish to SWF” coming!
http://blogs.unity3d.com/2011/02/27/unity-flash-3d-on-the-web
In an exciting blog post the Unity team say “In the past few months, our engineers have been investigating the possibility of adding a Flash Player exporting option to Unity. That investigation has gone very well, and we’re moving into full production.” – now that is freaking incredible! You can still code using AS3 and Unity, or move over to C# or any other language they support. This is a major move because there’s simply no better “game building” package out there.McFunkypants Molehill Terrain Demo
http://www.mcfunkypants.com/2011/molehill-terrain-demo/
Chris K is in the process of writing a book “Adobe Molehill Game Programming Beginner’s Guide” (which sounds freaking awesome). And he has released this lovely terrain demo showing off Molehill 😉Treasure Dungeon
http://acemobe.com/dungeon/demo.php
Takes a while to load, but when it does you’re treated to a nice looking 3D dungeon (apparently from the game Torchlight)Minko Quake 3 Level Test
http://aerys.in/minko-quake-3
A complete level from Quake3 using HD textures. Minko is a 3D engine for Flash and this demonstrates it’s ability to load BSP file formats, PVS rendering, light mapping and a nice FPS camera system.Zombie Tycoon
http://molehill.zombietycoon.com/
This game was demoed at Adobe Max and looked awesome back then. But to see it actually running in your browser is really special! Beautiful graphics and model work, and a fun game to boot. You have to play this 🙂How Fast is Molehill?
http://iflash3d.com/performance/how-fast-is-molehill/
A nice blog post detailing how 3D used to be done in Flash before Molehill, how it works in FP11 and what sort of speeds to expect. Pretty freaking awesome speeds, that’s what 🙂Oh and there’s a nice round-up of Molehill demos and articles over on Uza’s blog too 🙂
-
Flash Game Dev Tip #3 – Bullet Manager Part 1
25th Feb 2011
Tip #3 – Flixel – Bullet Manager Part 1
If you are coding a shoot-em-up, or even a platformer with guns, then you’ll have a need for the player to be able to fire bullets. Or the enemies to fire at you. This tip is about creating a Bullet Manager class. The class is responsible for the launch, update, pooling and re-use of bullets.
Object Pool
Creating new objects in Flash is expensive. By “new objects” I mean code such as:
var bullet:Bullet = new Bullet();
… which creates a brand new object an assigns it to bullet.
And by “expensive” I mean it takes time for Flash to process the request for the new object, assign memory to it and create it. If you are firing off tens of bullets every few seconds this can take its toll. And if you don’t actively clean-up the objects created you can quickly run out of resources.
To mitigate this problem we create a “pool”. This is a pool of resources (in our case bullets) that the Bullet Manager can dip in to. It will look for a free bullet, and recycle it for use in the game. When the bullet has finished doing what bullets do best, it will free itself up for use again. By using a pool you avoid creating new objects on the fly, and help keep memory in check.
Meet FlxGroup
Thankfully flixel has a class you can use to make this process simple. It’s called FlxGroup. You can add objects to a group, there are plenty of functions for getting the next available resource, and you can even perform group to group collision. Objects in a group are all rendered on the same layer, so are easy to position within your game. The first task is to create a pool of bullets to draw from.
In this example we’ve got a class called Bullet.as. Bullet extends FlxSprite with a few extra values such as damage and bullet type.
package
{
	import org.flixel.FlxSprite;

	public class Bullet extends FlxSprite
	{
		[Embed(source = '../assets/bullet.png')] private var bulletPNG:Class;

		public var damage:int = 1;
		public var speed:int = 300;

		public function Bullet()
		{
			super(0, 0, bulletPNG);

			//	We do this so it's ready for pool allocation straight away
			exists = false;
		}

		public function fire(bx:int, by:int):void
		{
			x = bx;
			y = by;
			velocity.y = -speed;
			exists = true;
		}

		override public function update():void
		{
			super.update();

			//	Bullet off the top of the screen?
			if (exists && y < -height)
			{
				exists = false;
			}
		}

	}

}
The important part is that the bullet sets exists to false when created to make it immediately available for use. When fired the bullet will travel up the screen. The check in the update method simply sets the bullet to not exist once it has passed y 0 (the top of our screen).
So far, so simple. Next up is the BulletManager.as class. This extends FlxGroup. It begins by creating a pool of 40 bullet objects and adding them to the group ready for use. As all of them have exists equal to false none will render yet.
package
{
	import org.flixel.*;

	public class BulletManager extends FlxGroup
	{

		public function BulletManager()
		{
			super();

			//	There are 40 bullets in our pool
			for (var i:int = 0; i < 40; i++)
			{
				add(new Bullet);
			}
		}

		public function fire(bx:int, by:int):void
		{
			if (getFirstAvail())
			{
				Bullet(getFirstAvail()).fire(bx, by);
			}

		}

	}

}
It has one extra method called fire. This gets the first available bullet from the pool using getFirstAvail (the first bullet with exists equal to false) and then launches it from the given x/y coordinates by calling the bullets fire function.
Are you feeling lucky?
I insert the Bullet Manager into the games Registry (see Tip #1 if you don’t know what the Registry is) so my Player class has easy access to it. My Player class is a simple sprite with keyboard controls to move it around. When you press CTRL it will fire a bullet:
Registry.bullets.fire(x + 5, y);The Bullet Manager handles the request and launches a bullet up the screen. The +5 after the x value is just to visually align the bullet with the middle of the space ship, otherwise it’d appear off to the left.
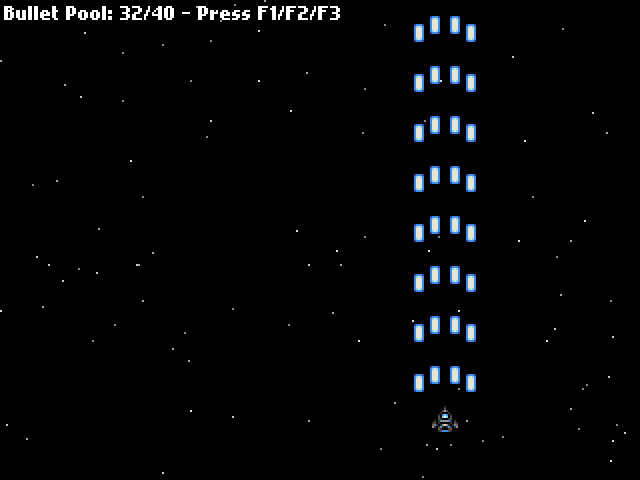
At the beginning of the Bullet Manager class I hard-coded in a limit of 40 bullets. That is enough for my game. As you can see in the screen shot above I’m only using 32 bullets out of a pool size of 40.
This value may not be suitable for your game. I don’t know what value you need, only you do. Perhaps you are coding the next Ikaruga, in which case you probably need 40 bullets per pixel 🙂 The thing is, you can tweak this as needed. And you can tweak it in-game too. It’s not a value that should change dynamically, but it could easily change from level to level as the game progresses.
Download
This example is about as simple as I could make it, but hopefully you can see the benefits already. In the next tip I’ll add group collision detection and something for you to shoot at.
Download the source code and SWF from the new Google Code Project page.
-
Flash Game Dev Tip #2 – Flixel and TweenMax pausing together
19th Feb 2011
Tip #2 – Flixel – Flixel and TweenMax pausing together
This is a super-simple tip, but I see it overlooked all the time. TweenMax is an extremely popular tweening engine for Flash. And rightly so. It’s fast, comprehensive, well documented and has loads of cool plugins. Ok so the object syntax is a little magical, but on the whole there are many good reasons to use it.
However one thing I see quite often is that when flixel games are paused, the tweens carry on playing. In a best case scenario it just causes visuals to glitch a little, in a worst case the game could crash.
The fix is amazingly easy, but it does require you to tamper with the core of flixel. For some reason there seems to be a serious allergy when it comes to devs wanting to do this, as if the framework itself is sacracant, never to be touched by mortal hands.
Utter bollocks.
Get in there and get dirty! It’s the only way to learn how it works. It’s a framework, not a bible. I’m quite sure when Adam created it he had no such illusion that it could do everything, and when it can’t, you bend it to do so.
So how do you get your tweens to pause in unison with your game? Easy, open up FlxGame.as and at the top import TweenMax, just like you would when using it in any other class. Then search for these two functions pauseGame() and unpauseGame()
For pauseGame change it to become:
/**
 * Internal function to help with basic pause game functionality.
 */
internal function pauseGame():void
{
	if((x != 0) || (y != 0))
	{
		x = 0;
		y = 0;
	}
	flash.ui.Mouse.show();
	_paused = true;
	stage.frameRate = _frameratePaused;
	TweenMax.pauseAll();
}
As you can see we’ve added the final line which tells TweenMax to pause everything. That’s tweens and delayed calls. This is an extremely useful feature of TweenMax, and well worth using instead of TweenLite (which doesn’t support this).
You can guess what we’re going to do with unpauseGame I’m sure:
/**
 * Internal function to help with basic pause game functionality.
 */
internal function unpauseGame():void
{
	if(!FlxG.panel.visible) flash.ui.Mouse.hide();
	FlxG.resetInput();
	_paused = false;
	stage.frameRate = _framerate;
	TweenMax.resumeAll();
}
While we are poking around here you’ll also notice that flixel changes the stage frame rate when it’s paused. If you don’t want it to you could always comment that line out. Equally you’ll see the Mouse pointer is shown and hidden from here too. If you’re not using a custom cursor, or want your mouse pointer visible all the time (like I do) then comment out both those lines as well.In short – play and experiment! Flixel is not a religion, it’s a framework. You build on-top of frameworks, and you tweak them until they fit.
More posts to tickle your grey matter ...
- Phaser Coding Tips 5
- Phaser Coding Tips 4
- Phaser 3 Development Log - w/e 30 Jan
- Phaser Coding Tips 3
- Phaser 3 Development Log - w/e 16th Jan
- Phaser Coding Tips 2
- Phaser Coding Tips 1
- Phaser v2.1.3 and Pixi v2 are out!
- Welcome to the DarkForge - An archive of all my old DarkBASIC code
- Phaser goes to the movies
Hire Us
All about Photon Storm and our
HTML5 game development services
Recent Posts
OurGames
Filter our Content
- ActionScript3
- Art
- Cool Links
- Demoscene
- Flash Game Dev Tips
- Game Development
- Gaming
- Geek Shopping
- HTML5
- In the Media
- Phaser
- Phaser 3
- Projects
Brain Food

