Flash Game Dev Tip #15 – Collectable Particles

Tip #15 – Collectable Particles in Flixel
This tip was born from a question I see raised in the Flixel forums often: How do you use an FlxEmitter to emit more complex particles. I.e. ones that are animated or have their own logic, and how could a player interact with those particles?
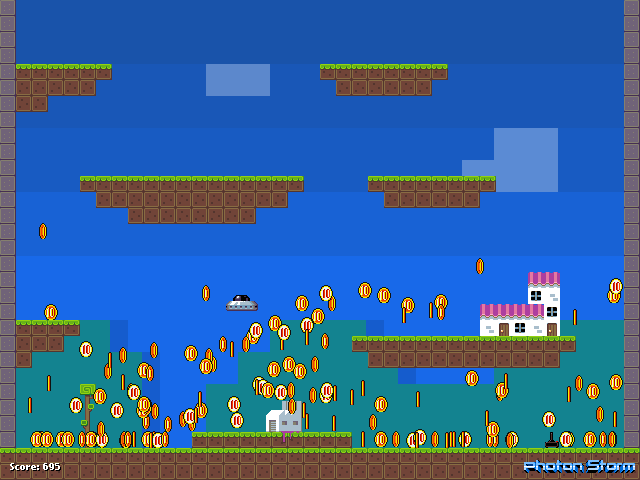
We’ll solve this by creating a simple demo. In it you can fly a small ufo around a tilemap using the cursor keys. Where-ever you click with the mouse a burst of particles will be created, in this case an explosion of coins. If you fly into them you can collect them. By grabbing the source code and reading through this you should then be able to modify this approach for your own game.

By the end it’ll look something like the above. Hit the jump for the full details, source code and example swf.
FlxEmitter
Our emitter is called coinEmitter and is created as follows:
coinEmitter = new FlxEmitter(0, 0, 300);
The first two values set the x/y coordinates, which we don’t need in this case. The final one sets the maximum size of the emitter pool. This is an important value. It should be large enough for the total number of particles that you need on-screen at any one time from this emitter.
If you emit a particle but already have 300 particles on-screen then the oldest one (the one first emitted) will be recycled and emitted afresh. You can see this if you download the source and change the value from 300 to say 50 and just hold the mouse down. As the 50th particle comes out, so the first one is killed and re-used.
After creating the emitter we’ll set some basic properties for the particles emitted:
coinEmitter.gravity = 350;
This should be obvious, by applying gravity to the particles they’ll fall nicely onto the tilemap which is what we want.
coinEmitter.setRotation(0, 0);
By default the emitter sets the min and max rotation of particles to be -360 and 360 respectively. If you don’t want your particles to rotate at all, which we don’t in this example, we reset this using the line above. It doesn’t actually matter what values you pass here, we use zero because it just makes sense, but flixel will ignore rotation as long as the min and max rotation values equal each other.
coinEmitter.setXSpeed(-160, 160);
This sets the horizontal speed at which the particle is emitted. A value of between -160 and 160 means it could fly either to the left or right at random anywhere up to those values.
coinEmitter.setYSpeed(-200, -300);
As you’d expect this sets the vertical speed. Using purely negative values here means the particles will shoot “up” into the screen. This combined with the gravity we’ve already set makes them shoot-up and then fall down nicely, bouncing off the tilemap as they do so.
for (var i:int = 0; i < coinEmitter.maxSize; i++)
{
	coinEmitter.add(new Coin);
}
This loop actually creates the particles, in this case “maxSize” is the value 300 we specified when we created the emitter. We loop 300 times adding a new instance of the Coin object to the emitter.
The Coin object
Any object you want emitted by an FlxEmitter must extend FlxParticle:
public class Coin extends FlxParticle
And as a result you need to call super() in your class constructor so the correct properties are applied. From this point on you treat it as a normal FlxSprite and can do anything an FlxSprite is capable of! Here’s the entire class (cut-down slightly) from the demo:
package
{
import org.flixel.*;

public class Coin extends FlxParticle
{
[Embed(source = "../assets/coin16x16.png")] private var coin16x16PNG:Class;

public function Coin()
{
super();

loadGraphic(coin16x16PNG, true, false, 16, 16);

addAnimation("spin", [1, 2, 3, 4, 5, 6], 12, true);

exists = false;
}

override public function onEmit():void
{
elasticity = 0.8;
drag = new FlxPoint(4, 0);

play("spin");
}
}
}
Our constructor just loads in a coin sprite sheet which contains a 6 frame animation sequence and sets that up. Make sure you don’t forget to set exists to false otherwise you’ll see the particles laying around on-screen until you use them.
The key to this class is in the onEmit function. This is called by the emitter when, you guessed it, the particle is emitted. In this example we set the elasticity, drag and start the animation playing. You could of course move the elasticity and drag assignments to the constructor but you may also want to try a random elasticity:
elasticity = Math.random();
This would set a random elasticity between 0 and 1 for every single particle emitted, which might give a nice effect!
Once the particle has been emitted its update function is called just like any other FlxSprite. You can override any FlxSprite function to modify it. For example you could test for collision, change the way the particle is killed, change the animation on the fly, all kinds of things. Just remember what I’ve said above with regard to setting the particle up and the world is your oyster 🙂
And Shoot!
So we’ve got an emitter and we’ve got a custom particle class. How do we actually make it, well, emit?
In this game we want the user to emit the particles by holding down the mouse button. So we check if the mouse is pressed, and if it is we position the emitter at the mouse x/y coordinates and emit a particle:
coinEmitter.x = FlxG.mouse.x;
coinEmitter.y = FlxG.mouse.y;
coinEmitter.start(true, 0, 0, 1);
In the above we call “start” on the emitter and tell it to burst out all of the particles at once. Now you may expect this to throw out all 300 of them, but by setting the 4th parameter (Quantity) to 1 it actually emits only a single particle, which is ideal for our needs. If you had a different style of game, for example if the player shoots a baddie and you want it to do a loot-drop of say 10 coins, then you’d change the Quantity to 10.
The other 2 values are the LifeSpan and Frequency. A life span value of zero means “live forever OR until the emitter next needs to recycle you”. Any other numeric value here sets a life span for the particle in seconds, after which time the particle is killed.
The Frequency value (3rd parameter) controls how often a particle is emitted if you are NOT bursting them all out at once. So if the first value of start() was set to false then Flixel would look to the Frequency value to determine how often it should blast a particle out. The value is given in seconds, so a value of 2 means it’d shoot a particle out every 2 seconds. 0.5 every half a second, and so on. You don’t ever use Frequency when you have a “burst” of particles, such as we have here, but it can be very useful in some cases when you just need a repeating emission of them over a period of time.
Particle Collision
Particles are just FlxSprites with a couple of extra functions, so you treat them in exactly the same way you’d treat collision with a sprite. For example in this demo game the tilemap is called level, so in the PlayState update function we run collision for the particles against the level:
FlxG.collide(coinEmitter, level);
and voila, they’ll bounce nicely off everything.
We’ve also got a player controlled ufo zooming around. So to detect for collision between this and the particles we can use an overlaps checking:
FlxG.overlap(ufo, coinEmitter, collectedCoin);
When the ufo and a particle collide the collectedCoin function is called. All this does is kill the particle and increase the score:
private function collectedCoin(player:FlxObject, coin:FlxObject):void
{
coin.kill();

FlxG.score += 1;

score.text = "Score: " + FlxG.score.toString();
}
But you could do anything you like. The reason I use overlaps and not FlxG.collide is that I don’t want the collision to effect the ufo, I just wanted it to be able to zoom into all the coins and collect them all up. If you use FlxG.collide then it’ll run collision and then separation meaning the ufo will bounce off the particle before it’s killed, which wasn’t the effect I wanted. But you may, so experiment with this.
Play and Download
Cursors to fly the ufo. Mouse click to emit particles (hold down for a long burst of them!)
[swfobj src=”http://www.photonstorm.com/wp-content/uploads/2011/11/CollectableParticles.swf” width=”640″ height=”480″ allowfullscreen=”false”]
Download a zip file contain the whole project, including assets, FlashDevelop project, source code and swf.
Share and Enjoy!
That’s all there is to using your own Class as a particle instead of the “defaults” that FlxEmitter has. Hopefully you can create something fun with it and leave a comment 🙂 or post them up to the Flixel forums for the benefit of all.
Posted on November 30th 2011 at 11:02 pm by Rich.
View more posts in Flash Game Dev Tips. Follow responses via the RSS 2.0 feed.
Make yourself heard
Hire Us
All about Photon Storm and our
HTML5 game development services
Recent Posts
OurGames
Filter our Content
- ActionScript3
- Art
- Cool Links
- Demoscene
- Flash Game Dev Tips
- Game Development
- Gaming
- Geek Shopping
- HTML5
- In the Media
- Phaser
- Phaser 3
- Projects
Brain Food


