Flash Game Dev Tip #8 – Building a Shoot-em-up Part 3 – Return Fire

Tip #8 – Flixel – Building a Shoot-em-up, Part 3 – Return Fire
This tip follows-on from Tip #4, where we added enemies and explosions into our game. But it was a little one-sided. This time the enemy are going to shoot back. And you’ll feel it, by way of a health bar and set of lives in our new HUD. Finally we’ll drop in the scrolling tile-map background and simple menu / game-over states. By the end it will look like this:
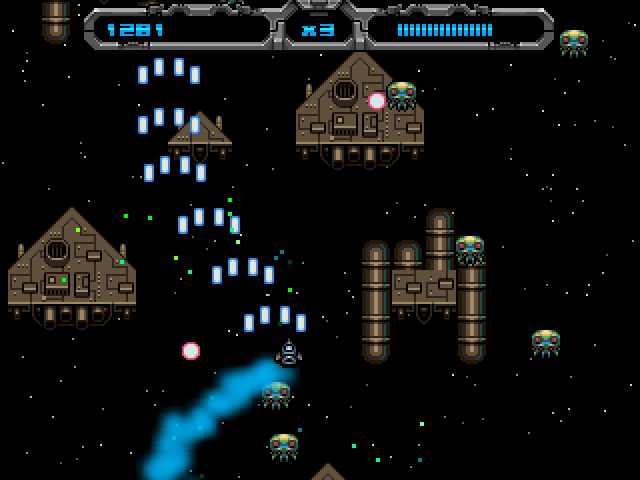
Note: I’ve embedded the game at the bottom of the tip.
Return Fire
Last time we added the Enemy Manager, which spawned a regular supply of enemies at us. Each enemy had a launch function which set it moving. Let’s add the ability to fire to that:
//	Will they shoot at the player? 70% chance of doing so
if (FlxMath.chanceRoll(70))
{
	willFire = true;
	fireTime = new FlxDelay(1000 + int(Math.random() * 500));
	fireTime.start();
}
This uses a new FlxMath function chanceRoll. The enemy has a 70% chance of firing at you. If this happens we create a new FlxDelay Timer of 1 second + up to an extra 0.5 second, and start it running.
Then in the Enemy update function we check that timer:
if (willFire && fireTime.hasExpired)
{
	Registry.enemyBullets.fire(x, y);
	willFire = false;
}
As you can see, this is calling the fire function in our Enemy Bullet Manager, passing in the x/y coordinates of the Enemy, which launches a bullet from the bullet pool:
public function fire(bx:int, by:int):void
{
	x = bx;
	y = by;

	FlxVelocity.moveTowardsObject(this, Registry.player, speed);

	exists = true;
}
FlxVelocity tells the bullet (this) to move towards the player at the value of speed (which in our case is 240 pixels per second).
Pixel Perfect Collision
If you are unlucky enough to be hit by our new enemy bullets then we need to damage your health.
Previously the game used native flixel collision, which is based on bounding-boxes (i.e. the rectangle that encloses your sprite). This isn’t desirable in a shoot-em-up. It meant the player could get shot without the enemy bullet even visually touching him. To address this we simply add one check into our bulletHitPlayer function:
public function bulletHitPlayer(bullet:FlxObject, player:FlxObject):void
{
	if (FlxCollision.pixelPerfectCheck(bullet as FlxSprite, player as FlxSprite))
	{
		//	Hurt the player by the bullet damage amount
		hurt(EnemyBullet(bullet).damage);

		//	Kill off the bullet, we're done with it now
		bullet.kill();

		//	Small FX
		Registry.fx.explodeBlock(x, y);

		FlxG.quake.start();
	}
}
The additional check is to run pixel perfect collision between the bullet and the player (I also added the same check between the player bullets and the enemies). Voila – now collision is accurate, and all deaths are your own fault 🙂
If they do get hit, we hurt the player with the value of damage. We also kill the bullet, set-off a small explosion and shake the screen (quake). Flixel will deduct damage from the player health, and if it drops to zero or below it calls kill:
override public function kill():void
{
	lives--;

	health = 100;
}
Here we just reduce the lives counter by one, and reset health back to 100. This isn’t the best way to deal with this, ideally we would stop enemies from shooting for a short-while, and actually explode the players ship before bringing him back with a new life. We’ll add that in a future tutorial.
Displaying health in the new HUD
The player has health, and the means to lose it, but no visual display of that. So I created a new class called HUD.as (which stands for heads-up display) to hold the game panel at the top of the screen. It looks like this:
![]()
The class is mostly about creating assets:
public function HUD()
{
	super();

	scrollFactor.x = 0;
	scrollFactor.y = 0;

	panel = new FlxSprite(0, 0, panelPNG);
	FlxDisplay.screenCenter(panel, true);

	score = new FlxBitmapFont(digitsPNG, 7, 6, "0123456789", 10, 1);
	score.setText("", false, 1, 0, FlxBitmapFont.ALIGN_CENTER);
	score.x = panel.x + 11;
	score.y = 12;

	lives = new FlxBitmapFont(digitsPNG, 7, 6, "0123456789", 10, 1);
	lives.setText(Registry.player.lives.toString(), false);
	lives.x = panel.x + 119;
	lives.y = 12;

	//	We create a Health Bar - if you look carefully at the colours, what we make is a totally black bar that acts as a "mask" over the hud image
	healthBar = new FlxHealthBar(Registry.player, 59, 6, 0, 100, false);
	healthBar.createFilledBar(0xff000000, 0x00000000);
	healthBar.x = panel.x + 158;
	healthBar.y = 12;

	liveUpdate = true;

	add(panel, true);
	add(score, true);
	add(lives, true);
	add(healthBar, true);
}
The scrollFactor commands lock the panel in place, so it isn’t scrolled by the new backdrop (see below).
The score and lives counters are using FlxBitmapFont with a custom-drawn font set (digitsPNG).
Finally we created an FlxHealthBar which we’ve hooked to Registry.player. The FlxHealthBar is an easy way to visually display the health value of an FlxSprite. It’s tied to the Player, and as the health value is modified (when the bullets hit) the health bar automatically detects it and updates itself. FlxHealthBar can do quite a lot, and is part of the Flixel Power Tools which I urge you to check out.
Hello Dolly
So we’ve got enemies firing at you and a brand new HUD to display the damage. So let’s make the final big change for this version – adding in a scrolling background.
The background is a tilemap based on a 16×16 tile set:

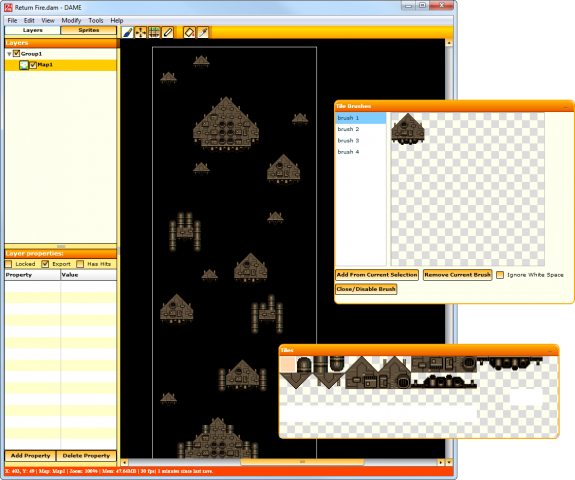
I used the map editor DAME to draw the background. Basically because it’s the best map editor I’ve ever had the pleasure of using, and because it’s quick and easy to output from. Here’s a zoomed-out shot of our background, drawn using Tile Brushes in DAME:
I’ll cover using DAME in more depth in a separate future tip, but there are tutorials on the DAME site to get you started. It’s well worth spending some time learning, because it allows for incredibly rapid game development. Once the map is drawn and ready it’s then a case of loading the tilemap into our game, and scrolling it vertically. Here is the complete ScrollingBackground class:
package
{
	import com.photonstorm.flixel.FlxStarField;
	import org.flixel.*;

	public class ScrollingBackground extends FlxGroup
	{
		[Embed(source = '../assets/mapCSV_Group1_Map1.csv', mimeType = 'application/octet-stream')] private var map1CSV:Class;
		[Embed(source = '../assets/tiles.png')] private var tilesPNG:Class;

		private var map:FlxTilemap;
		private var dolly:FlxSprite;
		private var stars:FlxStarField;

		public function ScrollingBackground()
		{
			super();

			//	The starfield behind the map
			stars = new FlxStarField(0, 0, FlxG.width, FlxG.height, 200, 1);
			stars.setStarSpeed(0, 0.5);

			//	Our scrolling background map, created using DAME
			map = new FlxTilemap();
			map.loadMap(new map1CSV, tilesPNG, 16, 16);

			map.scrollFactor.x = 0.5;
			map.scrollFactor.y = 1;

			//	This is an invisible sprite that our scrolling background tracks
			dolly = new FlxSprite(180, map.height);
			dolly.visible = false;

			//	Tell Flixels camera system to follow this sprite
			//	Call this AFTER setting the dolly coordinates to avoid the "camera panning to sprite" effect
			FlxG.follow(dolly, 1);

			add(stars);
			add(map);
			add(dolly);
		}

		override public function update():void
		{
			super.update();

			dolly.velocity.y = -20;

			//	Have we scrolled off the top of our map?
			if (dolly.y < -480)
			{
				//	Yes, so let's reset back to the start again (we unfollow first to stop camera jittering)
				FlxG.unfollow();
				dolly.y = map.height;
				FlxG.follow(dolly, 1);
			}
		}
	}
}
The code above is creating 3 new objects:
- A 2D starfield background (called stars)
- Our Tile Map (called map)
- An invisible sprite for the flixel camera to track/follow (called dolly)
In the update function all we do is move dolly slowly up on her Y coordinate. When she goes off the top of the map (+ an extra 240 pixels) we reset her back to the bottom again. This creates the effect of a continuously looping scrolling background.
I know that traditionally the backgrounds in shoot-em-ups don’t wrap, but at least we have this in place now. While what we have here now is really just eye-candy (i.e. you just fly over it all) that is soon to change 🙂 as we can easily drop-in cool features such as gun emplacements, map scenery to avoid and spawn points for different types of enemies.
Game Over, Man!
So far, so good. But what happens when lives hits zero? A check in the PlayState update function simply swaps us to the new GameOver state, which right now looks something like this:
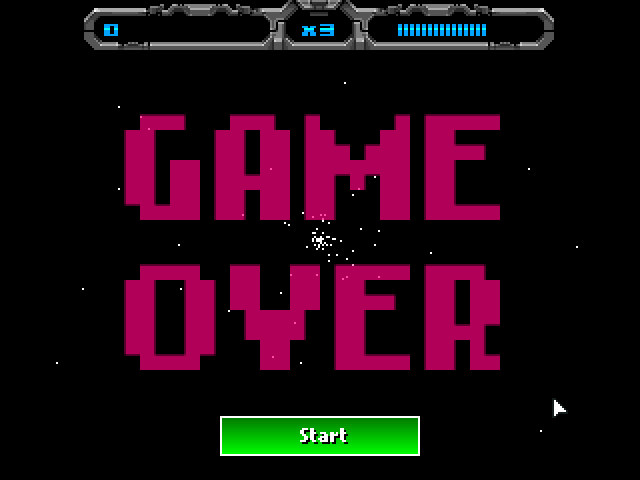
It’s not pretty, but it will do for now. And if you feel like extending this code further before the next tutorial, at least you have the classes in place now to do just that.
Play Time
Here is the game as it stands at the end of this tip. Have a play! Cursors / Arrows to move, CTRL to fire. The F1 to F3 cheats are still in, and you can press Q to quit at any point.
[swfobj src=”http://www.photonstorm.com/wp-content/uploads/2011/03/ReturnFire.swf” width=”640″ height=”480″ allowfullscreen=”false”]
Download
We’ve come a long way in one tip! Enemy fire, tilemaps, starfields. But we’ve really added very little code, yet got a lot for it. In the next instalment we’ll add some music and sound effects, and then look at making better use of our new tilemap.
Download the source code and SWF from the Flash Game Dev Tips Google Code Project page.
Posted on April 5th 2011 at 11:28 pm by Rich.
View more posts in Flash Game Dev Tips. Follow responses via the RSS 2.0 feed.
Make yourself heard
Hire Us
All about Photon Storm and our
HTML5 game development services
Recent Posts
OurGames
Filter our Content
- ActionScript3
- Art
- Cool Links
- Demoscene
- Flash Game Dev Tips
- Game Development
- Gaming
- Geek Shopping
- HTML5
- In the Media
- Phaser
- Phaser 3
- Projects
Brain Food

