12 Tools for Converting Flash Games to HTML5
As well as making our own games we also convert Flash games to HTML5 for clients. And having just finished our 9th conversion we’ve learnt a number of lessons along the way. So for fellow developers doing the same as us here is a list of our favourite tips, tools and libraries. Hopefully some of these can help you, and if you’ve got any others you would recommend then please leave a comment.
1) One Size Doesn’t Fit All
Every game we’ve done so far has been converted with the mobile web in mind. After all Flash is still plenty strong enough on Desktop, so our work has been in taking popular games designed for desktop and porting them ‘down’ to mobile browsers. As you’d expect the most immediate problem is that depending on how old the games are they can vary in size dramatically. From the classic 550 x 400 to more modern 800 x 600 and above. And needless to say, these don’t often play nicely with mobile resolutions.
The base minimum you are likely to need to support is 320 x 480 (portrait) or 480 x 320 if the game will be in landscape. This caters for iPhone 3 and older Android handsets. However before you start resizing graphics always factor in how much room the browser UI will take-up. For example on an iPhone 3 you will lose the top 20px to the status bar and the bottom 44px to the navigation controls, neither of which can be removed in default browsing mode. In portrait mode this gives you a visible area of 416px once you have scrolled the URL bar out of the way and a paltry 268px in landscape mode, less than the 8 year old Nintendo DS. On iPads, Android phones and tablets such as the Kindle Fire this changes again.
In short you should plan your game like you’d plan a presentation for an overhead projector: don’t put crucial information or items such as the “Play” button near the edges. And whatever you do, don’t assume that everyone will be playing your game at the same resolution. Stats from one of our own titles shows a staggering 4,000+ different reported resolutions.
Handy tip: If you’re going to mock-up screen shots for your client, make sure you do so with the browser UI visible. If you don’t they may assume the game is going to be full screen ‘just like a normal app’ when in reality it won’t. It may also save you precious design time later on if your designers know up-front they shouldn’t use device resolutions as their template.

2) Different graphics for Low Res and High Res Devices
I’m not going to labour on this point for long, but depending on the game you should almost certainly expect to be creating two sets of assets: SD (low resolution) and HD (high resolution) and dynamically load them based on device capabilities. You don’t want to squeeze a tiny game into the middle of an iPad screen for example, and as they’ve typically got the processing power to take advantage of pushing more pixels around it’d be wise to use that. There are a myriad of ways to deal with resizing your game for devices, and they all depend on how the game is built (canvas or DOM). Whatever you do don’t under-estimate the amount of work that goes into this aspect, but do plan for it up front.
Graphics and Animation
One of the biggest differences between Flash and HTML5 is the lack of a timeline or any real usable form of vectors. The most common way to address this is to convert animated MovieClips into Sprite Sheets or Texture Atlases, and there are plenty of tools out there to help with this.
3) Flash CS6 – $wtf
Ok so it’s not cheap, but if you still need to use Flash anyway then it makes a lot of sense to consider upgrading to CS6 if you haven’t done so already. You can now right-click a MovieClip, or multiple MovieClips in the library and you’ll get the option to generate a sprite sheet (as this video shows). This pops-open a new window that allows you set the properties of the export. This includes the packing algorithm, ‘Basic’ puts all frames into the same sized rectangles and ‘Max Rects’ sorts them into available space. Border and Shape padding stop the frames butting up against each other too closely and the ‘Data Format’ lets you pick from several options including JSON Hash and JSON Array formats. The PNG is and resulting data file are pumped out.
![]()
It’s functional but it works well, and having it built directly inside Flash is a real time saver in some instances. We have a few minor issues with it though. First the resulting PNG doesn’t seem to have the option to be cropped, instead always using a fixed width/height (meaning lots of empty space at the sides of the sheet). And secondly when converting graphics for mobile web you nearly always need to resize them. There’s no option to do this in export which means you have to manually resize all of the MovieClips before you export them. Depending on how many you’ve got this could be a seriously tedious process, especially if you have to do it twice for two resolutions.
4) Texture Packer – $25
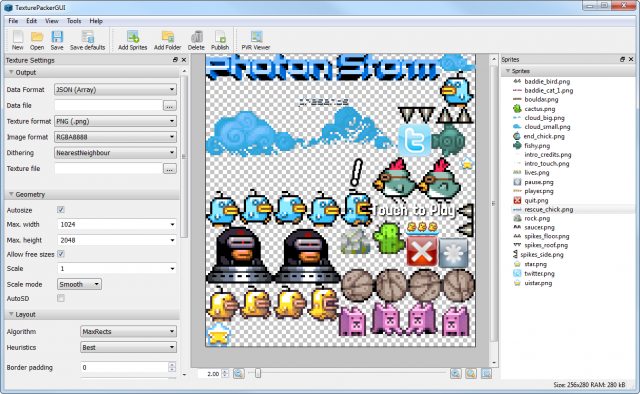
Texture Packer is created by the one-man-band company Code and Web run by Andreas Löw. Available for Mac, Windows and Linux it provides a clean interface to creating texture atlases with a huge number of options. The reason we’ve highlighted it out here is because it has the ability to import SWF files, although this is slightly problematic as we’ll discuss. When the SWF loads the frames are presented in order and you can then pick how best you want them exported. From Basic packing to Max Rects and even supporting rotation you can be sure it will create a suitable PNG at the end. There are lots of export data formats including the vital JSON Hash and Array, and some really nice touches such as cropping and trimming frames, advanced dithering options and the ability to automatically create x2 (HD) versions of the resulting file just by ticking a box. It will also deal with PSDs (to a point!), PNGs and other image files, and you can save the settings on a per sheet basis which is handy for later tweaking.
The downsides to using Texture Packer, from a Flash perspective are this: You need to ensure that the SWF you give it has been carefully prepared in advance. Often this involves taking the MovieClip you need from the library, copying it to a new blank FLA and publishing just that with the clip positioned in the correct place. Once you’ve got the SWF prepared Texture Packer makes short work of packing it, but it’s still a manual process you need to go through. In terms of ‘real world’ time I’d say it takes less time doing this however than using Flash CS6, because you can use the ‘Scale’ and x2 features of Texture Packer to make short work of producing the different resolution versions – so you don’t have to pre-scale the MovieClip in Flash first like you do with CS6.
There are also a few issues in terms of the Beta version of Texture Packer constantly expiring at really annoying times – as happened to us recently when it expired in the middle of a major project and we had to wait for a new release to resolve it. All in all though, you’d be mad not to try it.
5) ShoeBox
ShoeBox is a lot more than just a Sprite Sheet maker. As its name implies it’s a collection of utilities wrapped up in a slightly strange and esoteric user interface, which none-the-less does actually work. When started you’ll see a floating grey slab with 3 tabs, each of which has different utilities in them such as ‘Pack Sprites’, ‘Extract Tiles’ and more. You use them by dragging your source files into these little icons. So if you want to create a sprite sheet from a SWF file, drag the SWF onto ‘Ani 2 Sheet’ and voila, out comes a sprite sheet.
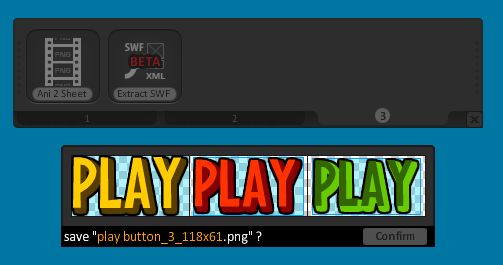
If you right-click any of the icons you’ll access the configuration settings, allowing you to change some important settings. The settings can even be saved into templates, of which several are provided. One thing you’ll probably want to change quickly is the frame limit as it’ll only parse the first 60 frames of any SWF file you drag in. While not nearly as featured as Texture Packer it does an excellent job at providing tools you probably never knew you needed until you used them 🙂 The JPEGA tool for example is extremely smart, and allows you to create JPEG sprite sheets that extract all of the alpha data into an alpha mask, for compositing back at runtime. On a quite extensive tile sheet we tested we dropped the file size from 1.4MB down to 450KB using this feature alone.
The one annoying feature of ShoeBox is the way the resulting sprite sheets are displayed. Ideally they’d be in a fixed size window that you could then scroll the contents of, but instead it tries to display the entire thing on-screen with a tiny ‘Confirm’ button to save it at the bottom. This is fine until you start generating 2048 sized sheets and it no longer fits on your monitor (unless you own a Mac Retina display I guess). All issues re: having to prepare SWFs in advance that apply to Texture Packer above also apply here too.
Other useful tools include ‘Cut Out Sprites‘ which can basically reverse engineer a sprite sheet, extracting single bitmaps from a given PNG. There’s also ‘Extract Tiles’ which will take an image and create a tileset from it based on matching areas. There are tile mapping packages like DAME that provide this feature, but it’s nice to have as a stand-alone although it’d be great if it exported the map data as well 🙂 Being an AIR app ShoeBox will run on Windows or Mac and given the price is well worth adding to your suite of tools.
Download from the ShoeBox web site.
6) Zwoptex – $15
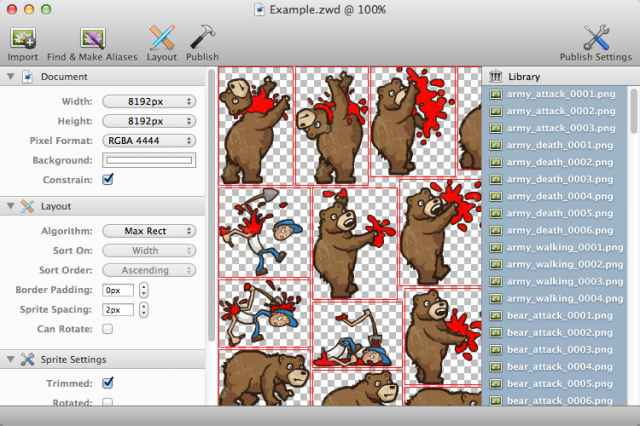
This is a bit of an outlier in this round-up, being both Mac only and unable to import SWF files. But I’m listing it because it has the neat feature of being able to generate sprite sheets to multiple targets (and scales) at the same time. Similar to Texture Packers Auto x2 feature, but to as many versions as you need – which can be a handy feature depending on the game.
More details on the Zwopple web site
7) XnView
XnView is a fantastic free app for Windows, Mac and Linux that at its heart is an image viewing package. It supports 400+ formats, including some seriously retro ones such as Sinclair Spectrum, C64, Atari ST and Amiga IFF formats. Although that tickles my inner geek it isn’t the reason I listed it here however. As well as being a great viewer it has a bunch of useful tools including ‘Strip of Images’. Feed this plugin any folder or set of images and you can configure how it builds a new image from them. Either fully horizontally, vertically or in a mosaic (grid) with optional spacing, width, height, background colour and number of images per row.
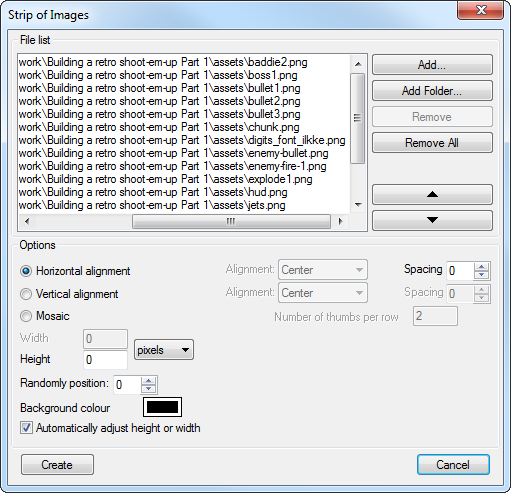
Because it’s running on the same engine that XnView uses natively it means you can use this plugin to create sprite sheets from just about any image format you care to think of (and probably hundreds you never even knew existed). Being a solid native app it also performs extremely well in terms of speed and memory use, being one of the fastest tools we use. Also essential for fast image batched conversions, image processing and we’ve even had call to use it to extract a sequence of frames from an MNG movie!
Download from the XnView web site
Zoe, SWF Sheet, etc …
There are other tools available to turn SWFs into Sprite Sheets. Zoe, part of the Adobe backed CreateJS suite is one of them. It’s an AIR app that allows you to drag in SWFs, set a few parameters and get sprite sheets out again. Export options are extremely limited however, you’re still hampered by the same problem of needing to create SWFs from all your animations in the first place, and scale them, that it makes the more powerful alternatives a better choice right now. It is however free, and given the sheer complexity of Flash animations it’s possible Zoe could handle something that another packer can’t, so it’s worth having installed just in case. Download Zoe from the CreateJS web site. A quick Google search will also bring up similar apps, but we’d recommend sticking with the bigs guns for now.
Non-Sprite Sheet Animation
Now all of the above tools assume you want to create sprite sheets, but that isn’t the only way to build animations. Flash natively has a lot of animation data stored in it that’s extremely useful to us outside of the IDE. All it takes is a tool like Silenus to get to it:
8) Silenus
Created by the fine folks at Sileni Studios it works by taking the native XFL animation data that Flash CS5+ saves and allow you to play back the animations without using Flash Player.
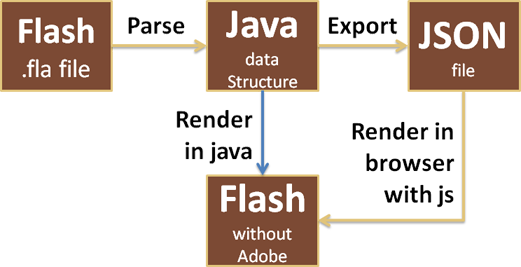
At its core Silenus is a java library which allows for java pps to read and render Flash animations. But don’t let this put you off! It also allows you to export the animation data to JSON which you can playback in browser with JavaScript, and a canvas based renderer is included in the download. It doesn’t support everything Flash can do obviously, some effects such as filters and timeline code are skipped, but it can handle an impressive Flash subset including:
- Multiple scenes
- Layer hierarchies
- Translation, scaling, rotation
- Classic tweening with custom eases
- Vector graphics: straight lines, curves, line caps, joints, …
- Masks (clipping)
- Animation with inverse kinematics (IK)
- Color effects: alpha, brightness, tint, advanced, linear gradients
- Automatic reconstruction of PNG and JPEG images from the internal Flash binary format (files in the XFL format still keep images in an Adobe-specific binary format)
Silenius built the tool to aid the creation of their HTML5 game CastleQuest so that their animators could carry on using Flash for all animation, but the end results would still work in-game. It takes getting used to and you’ll have to get your hands dirty with the code, but nothing else comes close for proper Flash animation playback right now.
You can download Silenus from google code (I really wish they’d put it on github so it’d get more visibility!)
9) Spriter – $?
Spriter is a bitmap based animation tool that uses a modular time lined approach to animation, in the same way that Flash does. Their web site describes it as:
“Spriter enables the “modular” method of animating where, instead of each frame being a single complete image, it is constructed from many small, re-useable images (such as body parts). Each of these images that are used to construct the full frame can be scaled and rotated to further increase the “mileage” an artist can get from them.”
Listing it here is a little bit cheeky, because although we’ve played with it a lot, supported it during its KickStarter and follow development closely, we haven’t actually used it in a released game yet because it’s still a little ‘green’. However this is changing and we’re actively coding support for its open file format in our new html5 game framework. In terms of helping with Flash workflow it doesn’t directly unless you want to re-create the original animation inside of Spriter. Going forward we can easily see a point where the animations will just be made in Spriter directly and exported straight to our games.
Find out more about Spriter at the Brash Monkey web site.
Sound
10) Preparing Sound Sprites
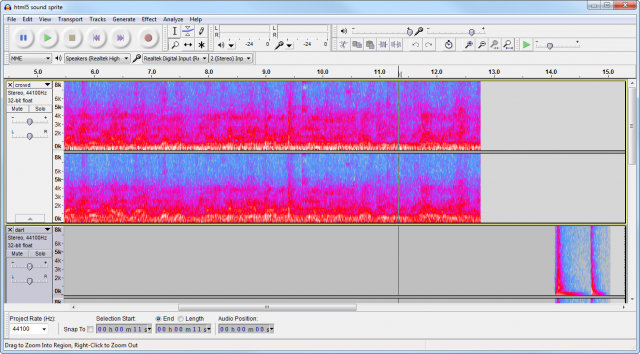
It’s fair to say that sound is still a significant issue on mobile browsers. It’s soon going to get a lot better, with Web Audio coming in iOS6 and Chrome being default on Android, but until those have dominance we’re left dealing with the wonderful joy that are sound sprites. Sound sprites are essentially one audio file with each of the different sound effects and pieces of music that you need laid-out in the file back-to-back, with 1 to 2 seconds worth of silence between them. Very similar to how you’d pack images into a sprite sheet. Here’s how the sound file looks for one of our games:
![]()
The waveform at the start is the intro music. The 2nd and 3rd peaks are in-game sound effects and the final sample at the end is the game over track.
The important thing when creating a sound sprite is that you align the start of the samples to perfectly match the start of the second (in time). So the music starts at 0 seconds, the effect at 25 seconds and the game over track at 35 seconds. The silence between them can be variable, but make sure the samples themselves align.
As well as needing to create sound sprites you’ll also need to prepare the file in several different formats. We use the following:
- ac3
- mp3
- m4a
- ogg
- amr
This will satisfy every mobile browser out there. The amr format is a low-end codec designed for voice that is supported on pretty much any mobile you can throw it at, so is a neat, if low-quality fall back.
iOS Limitations: On iOS 5 there is no ability to play sounds in parallel. So you can’t have background music and then play sound effects over the top. We suggest you just cut to play the effect then return to the position at which you’d go to in the music. If you use JukeBox (see 9 below) it will handle this automatically for you. Another iOS 5 limitation is that you can only have one mp3 file loaded at once, which is why we use sound sprites, and you can only start playing of it via a user initiated touch event. This often means making the music start when the player touches the ‘Play’ button on your title page for example.
Tip: Use an AIFF Container / IMA4 Compression. On iOS encoding your audio using a Core Audio supported format will avoid some of the latency and decoding issues present in other formats.
Performance: There is no getting away from it, audio slows games down on mobile. Depending on the device it can even crash a game outright. If you’ve got a lot of movement or action going on then dropping in a looping background track will sometimes kill your frame rate. On one of the Android phones we use for testing it even managed to make the phone reboot. So be careful, and manage expectations with your client too. Ideally you don’t have any in-game looping music at all, or code it cleverly so that you at least don’t start it playing if the frame rate is perhaps already struggling a little.
11) JukeBox

JukeBox is a small set of JavaScript libraries created by Christoph Martens of Zynga Germany. After much testing and deliberation they are our preferred method of audio playback in HTML5. Comprising of a player and sound manager they support a flexible Sound Sprite format which is easy to configure and use, dynamic loading of files, Flash fall back on Android and most importantly of all they are optimised for games. You can customise the sound manager to run on your own game loop, which is ideal when trying to maintain performance on mobile.
12) Audacity + Lame and FFmpeg
We’ve not yet found a tool that will easily create sound sprites for us. So for now we make them manually using Audacity. For most audio work we prefer Adobe SoundBooth, but Audacity when loaded up with the Lame MP3 Encoder and FFmpeg extensions can save your sound sprite in every format needed, something SoundBooth cannot.
Download Audacity from its web site. There are comprehensive instructions on installing the Lame MP3 Encoder and the FFmpeg encoder. It’s a bit of an ordeal finding the right files amongst all the banner ads, but once set-up you’ve got an audio editor that export to every format you need.
That’s all for now
Obviously we’ve just covered the process of converting assets here. The actual coding will vary depending on project and the person doing it, so we didn’t want to start suggesting libraries or frameworks – there are plenty of lists if you need!
If you have any more asset / workflow related tips or tools, please leave them in the comments.
Posted on July 18th 2012 at 8:55 pm by Rich.
View more posts in HTML5. Follow responses via the RSS 2.0 feed.
Make yourself heard
Hire Us
All about Photon Storm and our
HTML5 game development services
Recent Posts
OurGames
Filter our Content
- ActionScript3
- Art
- Cool Links
- Demoscene
- Flash Game Dev Tips
- Game Development
- Gaming
- Geek Shopping
- HTML5
- In the Media
- Phaser
- Phaser 3
- Projects
Brain Food

